How to Set Up Your Own Censorship-Proof VPN with XRAY VLESS WireGuard Using Cloudflare
If you live in a country where the internet is heavily censored, you already know how frustrating it is. Websites blocked. VPNs detected and throttled. Standard protocols flagged by deep packet inspection (DPI) the moment you try to connect. Traditional VPN solutions simply don't cut it anymore. Governments have gotten smarter, and so should your tools.
In this guide, we'll walk you through setting up your own private, censorship-proof VPN server using XRAY (VLESS + WebSocket + TLS) tunneled through Cloudflare's CDN, with an optional WireGuard layer for full system-wide VPN connectivity. We've built an automated script that handles the entire setup for you in minutes.
Why This Works When Regular VPNs Don't
Most commercial VPN services use well-known protocols like OpenVPN or standard WireGuard. Government-level DPI systems have long since learned to fingerprint and block these protocols, even when they're encrypted. The connection patterns, handshake signatures, and packet sizes give them away.
This setup takes a fundamentally different approach. Instead of trying to hide VPN traffic, we disguise the connection between your device and the server as ordinary HTTPS web browsing by routing it through Cloudflare's massive CDN network. Once traffic reaches your VPS, it exits to the internet directly from your server's IP, just like a traditional VPN. The key difference is how the tunnel itself is hidden. Here's why it's so effective:
- Your tunnel to the server goes through Cloudflare. The censoring ISP or government sees your device making TLS connections to Cloudflare IP addresses, the same IPs that serve millions of legitimate websites worldwide. They never see your VPS IP or anything resembling a VPN connection.
- VLESS over WebSocket is invisible inside TLS. The actual proxy protocol is wrapped inside a WebSocket connection, which itself is encrypted by TLS. There's nothing for DPI to fingerprint.
- Blocking you means blocking Cloudflare. Any attempt to block your tunnel traffic would require blocking Cloudflare entirely, which would break a significant portion of the internet. That's a price most censors aren't willing to pay.
- Websites see your VPS IP, not Cloudflare. Once your traffic reaches the VPS, it goes out to the internet directly from your server. This is exactly how a normal VPN works. Cloudflare's role is solely to protect the tunnel between you and the server from detection.
- A decoy website adds another layer. Anyone visiting your domain in a browser sees a normal website. Only traffic hitting your secret WebSocket path reaches the VPN. Everything else gets served a regular webpage.
What You'll Need
Before we start, make sure you have the following ready:
-
A VPS running Ubuntu 24.04. You can grab one from ExtraVM if you don't already have one. You just need a minimum of 1GB RAM.
-
A domain name. Any domain works. You can use a subdomain of an existing domain. If you don't have a domain, you can even purchase one from Cloudflare directly for around $10 USD for one year.
-
A free Cloudflare account. Your domain's DNS needs to be managed through Cloudflare. This is free and takes just a few minutes to set up if you haven't already. WARNING: This activity is not supported by Cloudflare, and could breach their terms of service if abused.
Step 1: Point Your Domain to Cloudflare
If your domain isn't already on Cloudflare, head to dash.cloudflare.com and add it. Cloudflare will walk you through updating your nameservers.
Once your domain is active on Cloudflare, create a DNS record for your VPN subdomain:
- Type: A
- Name:
vpn(so it becomesvpn.extravm.com) - Content: Your VPS server's IP address
- Proxy status: Proxied (the orange cloud must be ON)
This is the critical part. The orange cloud means your traffic to the server routes through Cloudflare's network, which is what makes the whole setup work.
Then, navigate to SSL/TLS → Overview and set the encryption mode to Full (Strict).
Step 2: Generate a Cloudflare Origin Certificate
Still in the Cloudflare dashboard, go to SSL/TLS → Origin Server and click Create Certificate. Keep the default settings (RSA 2048, 15-year validity) and click Create.
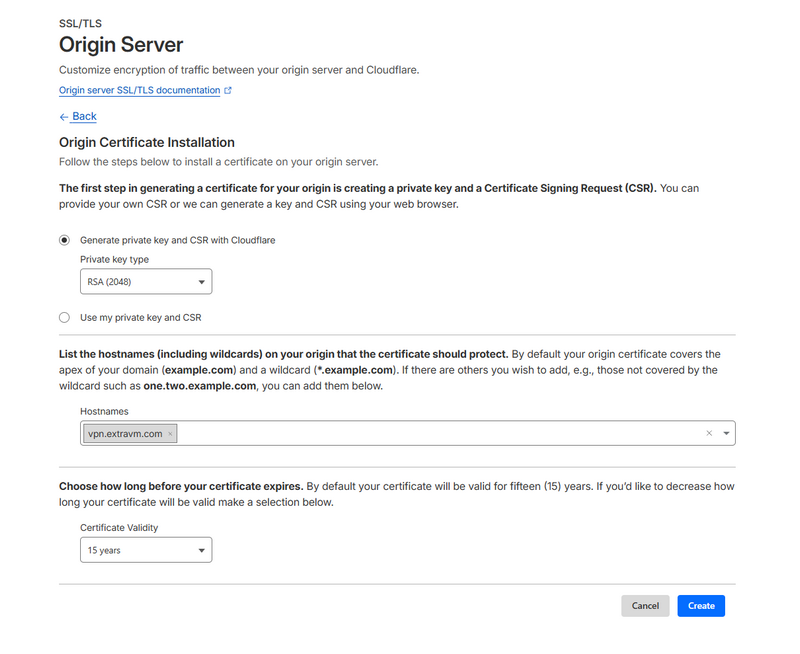
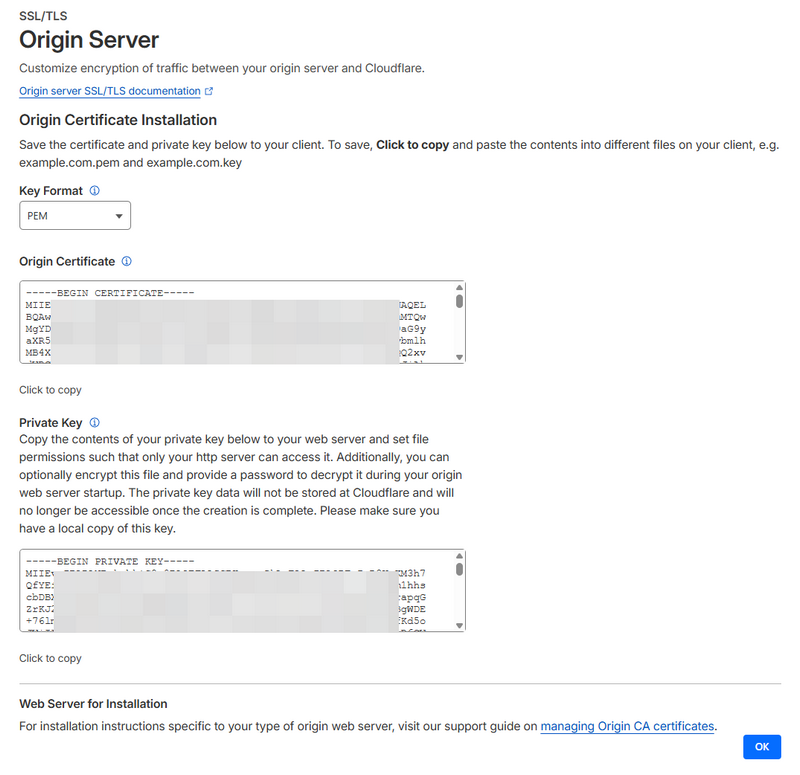
You'll be shown two things: an Origin Certificate and a Private Key. Copy both of these somewhere safe. You'll paste them into the setup script in the next step. Cloudflare will only show you the private key once, so don't close this page until you've saved it.
Also make sure WebSockets are enabled under Network → WebSockets in your Cloudflare dashboard.
Step 3: Run the Setup Script
We've built a script that automates the entire server-side installation. Upload it to your VPS and run:
sudo curl -L https://extravm.com/blog/uploads/xray-wg-setup.sh -o /root/xray-wg-setup.sh
chmod +x /root/xray-wg-setup.sh
sudo bash /root/xray-wg-setup.sh
The script will walk you through everything interactively. It'll ask for:
- Your domain (e.g.,
vpn.extravm.com) - Your server's public IP (auto-detected)
- Your Cloudflare Origin Certificate and Private Key (paste them in)
- Whether you also want WireGuard set up (recommended)
- Whether you want a decoy website installed (recommended)
The script then handles all of the following automatically:
- Installs and configures XRAY with VLESS + WebSocket + TLS
- Sets up the Cloudflare origin certificate for TLS termination
- Installs and configures WireGuard with auto-generated keys
- Deploys a decoy Nginx website for non-VPN visitors
- Configures UFW firewall rules
- Generates a ready-to-use client configuration and VLESS URI
- Produces a WireGuard QR code you can scan from your phone
- Saves all connection details to
/root/vpn-connection-info.txt
Once it finishes, you'll see all your connection information printed right in the terminal:
Click here to see a screenshot of the full install script run in an SSH window
Step 4: Connect Your Devices
For XRAY (proxy-based, app-level routing)
The script outputs a VLESS URI that you can import directly into any compatible client app. Just copy the URI and paste it in:
- Windows / Mac: WireGuard, v2rayN, Nekoray, or Hiddify
- Android: WireGuard, v2rayNG or Hiddify
- iOS: WireGuard, Streisand, FoXray, or V2Box
- Linux: WireGuard, Nekoray or v2rayA
Import the VLESS URI, connect, and you're done. Your tunnel to the server is routed through Cloudflare as standard HTTPS, making it invisible to DPI, while your outbound traffic exits from your VPS like a normal VPN.
For WireGuard (full system VPN)
If you chose to set up WireGuard, the script also generates a client config file and a QR code. On mobile, just open the WireGuard app and scan the QR code displayed in the terminal. On desktop, import the /root/wg-client.conf file.
For maximum censorship resistance, you can tunnel WireGuard traffic through the XRAY connection using tun2socks, which routes WireGuard's UDP packets inside the WebSocket tunnel through Cloudflare. The connection info file includes instructions for this.
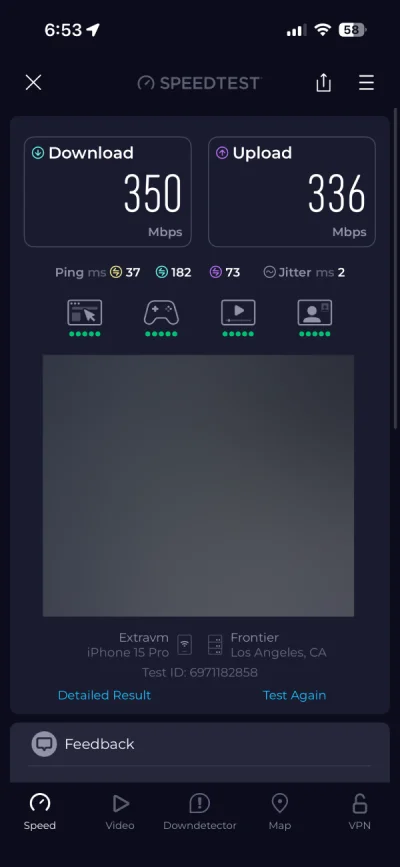
Here's a speed test from a phone connected through the full tunnel on a 350 Mbps connection. Performance stays solid even through the proxy chain due to the WireGuard server efficiency:
Tips for Staying Under the Radar
Once everything is running, here are a few extra tips to keep your setup reliable:
- Keep the Cloudflare proxy (orange cloud) ON at all times. If you switch it to DNS-only, your server's real IP gets exposed and DPI can target it directly.
- Use a realistic-looking domain. Something like
blog.yourdomain.comorcdn.yourdomain.comdraws less attention thanvpn.yourdomain.com. We usedvpn.extravm.comas an example here, but in practice, you'd want something more inconspicuous. - Enable the decoy website. If anyone, or any automated system, visits your domain in a browser, they should see a normal webpage. The script sets this up for you.
- Don't share your VLESS URI publicly. Treat it like a password. If it's compromised, generate a new UUID on the server and update your clients.
- Keep your server updated. Run
apt update && apt upgrade -yregularly, or enable unattended upgrades.
Troubleshooting
Can't connect after setup?
Double-check that Cloudflare's proxy is enabled (orange cloud), SSL mode is set to Full (Strict), and WebSockets are turned on. Then verify XRAY is running with sudo systemctl status xray.
Getting 502 errors?
This usually means XRAY isn't responding on port 443. Check the logs with sudo journalctl -u xray -f and make sure the certificate paths in the config are correct.
Slow speeds?
Cloudflare's free tier has no bandwidth cap, but performance varies by edge location. You can try switching XRAY's transport from WebSocket to gRPC for potentially better throughput. Also ensure your VPS itself has adequate bandwidth. ExtraVM plans include generous allocations on fast network ports.
Connection drops frequently?
Add PersistentKeepalive = 25 to your WireGuard client config (the script includes this by default). For XRAY, make sure your client app has keepalive or mux settings enabled.
Wrapping Up
Setting up your own censorship-resistant VPN doesn't have to be complicated. With this script, you can go from a fresh Ubuntu server to a fully working, DPI-proof connection in under 10 minutes. The combination of XRAY's VLESS protocol, Cloudflare's CDN, and an optional WireGuard layer gives you a setup that's both fast and virtually undetectable.
If you need a reliable VPS to run this on, check out our plans at ExtraVM. All of our servers come with full root access, fast networking, and the performance you need to run a smooth VPN tunnel.
Stay safe out there.
Have questions or run into issues? Open a ticket with our support team. We're happy to help.